
写在前面
阅读《图解HTTP》,大致理解了 SSL/TLS 的握手过程和思想原理。然而作为入门书,它没有介绍基于 DH 算法的 TLS 握手过程,也没有介绍证书链相关的知识😡。我 Google 了不少资料,着重啃了几篇文章,结合抓包分析,本想“差不多得了”,却没料到入了大坑,疑问不减反增。
一筹莫展之际,AI 技术大火,救我狗命。受此鼓舞,借助 AI 解惑,又打起精神啃读了多个 RFC 片段,遂拨云见日。本文既成,虽得益于天时,然亦可谓一波三折,历尽艰辛。我真牛逼👍。
本文主要基于 TLS1.2 研写,知识整理于此👇。
先行概念
> 密码体制
密码学主要有两种体制:
- 共享密码体制(对称密码体制)
- 公钥密码体制(非对称密码体制)
> 数学难题
公钥密码体制主要基于以下数学难题:
- 大整数分解问题
- 离散对数问题(DLP)
- 一般的离散对数问题
- 椭圆曲线离散对数问题(ECDLP)
一般的说法中,通常将椭圆曲线离散对数问题单独作为一类,与离散对数问题、大整数分解问题一起,并称密码学三大数学难题。椭圆曲线离散对数问题比一般的离散对数问题更加困难,自然就诞生了基于椭圆曲线的密码学,被称作椭圆曲线密码学(ECC)。一些原本基于一般离散对数问题的算法被移植到椭圆曲线上,就有了 ECC 的算法版本,比如 DH 算法的椭圆曲线版本,就叫 ECDH 算法。
一些公钥算法与数学难题的对应关系:
- RSA - 大整数分解问题
- DH、DSA - 一般的离散对数问题
- ECDH、ECDHE、ECDSA - 椭圆曲线离散对数问题
TLS 握手过程
TLS 在握手中主要做了三件事——身份认证、密钥交换和完整性校验。握手主要是为了生成并交换共享密钥,这个过程是使用公钥算法进行的,客户端和服务器都拥有共享密钥后,后续的通信再使用共享密钥算法进行加密。这是安全和性能综合考量的结果。公钥算法安全但性能消耗多,共享密钥算法相对不那么安全但性能消耗少,所以真正的加密通信使用共享密钥加密,而且共享密钥的交换则由公钥算法实现。
以下基于 TLS1.2 阐述其握手过程。
基于 RSA 算法
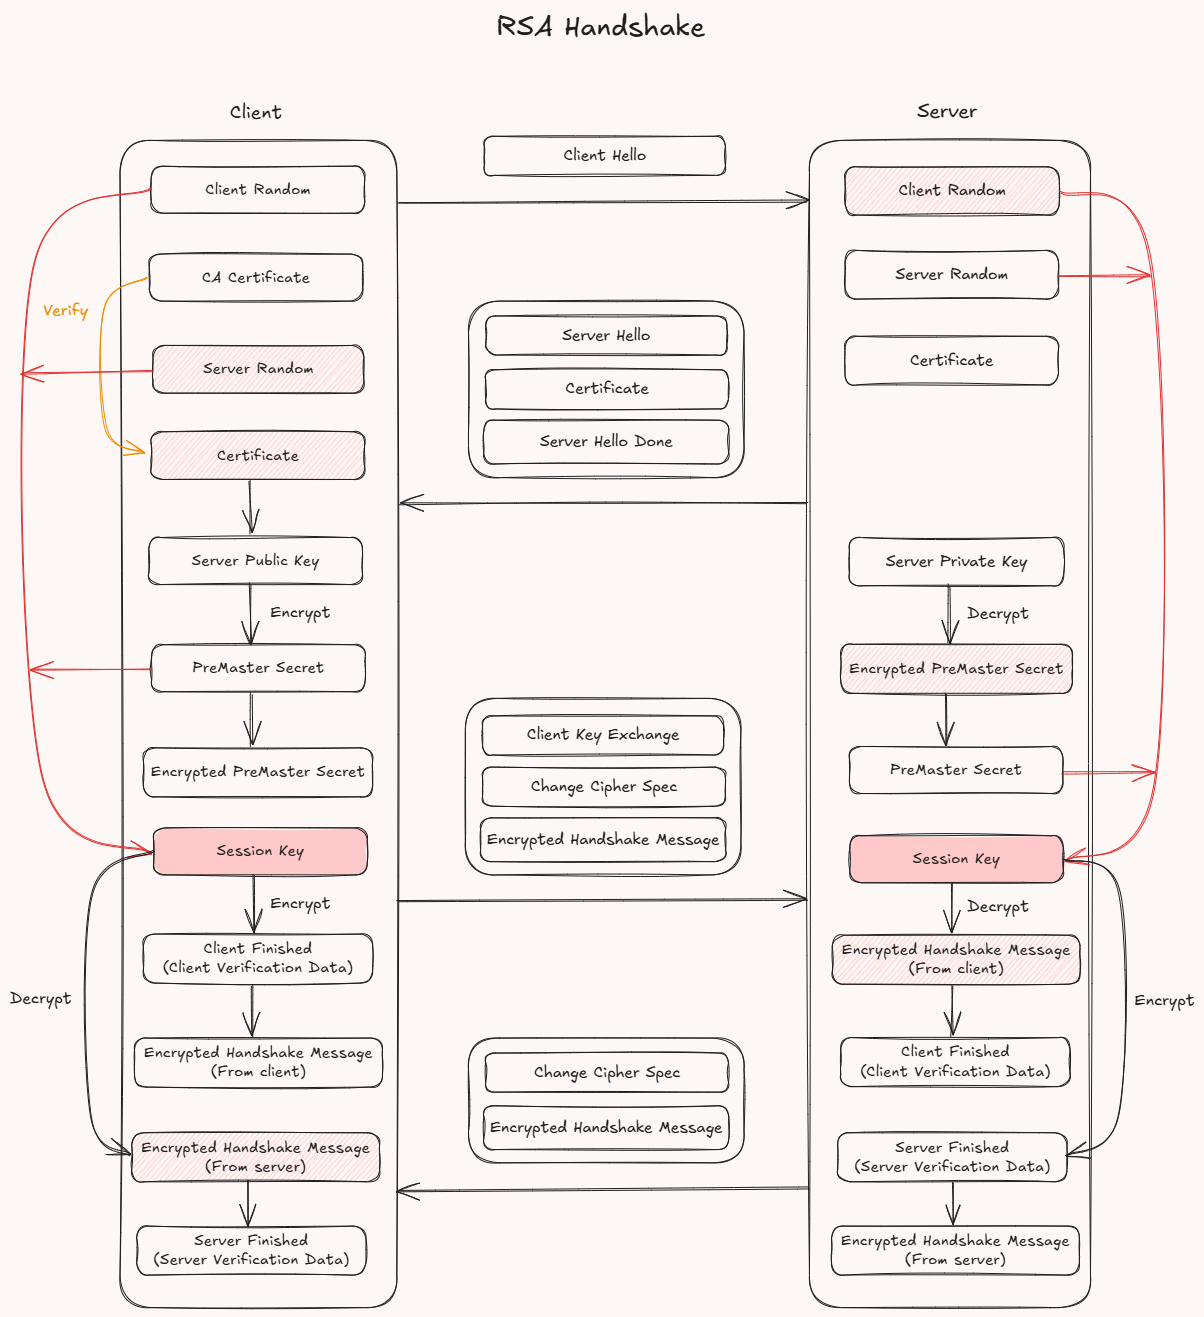
步骤 1 - 发起连接,协商参数
客户端发送 `Client Hello`。
客户端生成随机数 Client Random,并发送 Client Hello 报文。该报文中包含 Client Random 随机数以及客户端支持的算法套件等信息,这些信息被传递给服务器用于协商。

步骤 2 - 协商参数,发送证书
服务器发送 `Server Hello, Certificate, Server Hello Done`。
-
服务器从
Client Hello中获得随机数Client Random。 -
服务器生成
Server Random,将该随机数包含进Server Hello中。服务器依据自身情况,从客户端算法套件中挑选一个自身支持的算法,将其包含进Server Hello中。 -
服务器发送自己的证书。证书中主要包含以下信息:
-
服务器的公钥
-
服务器的域名
-
其它附加信息
-
CA 的签名:使用 CA 的私钥对上述证书信息的哈希值加密所得的结果。
1
signature = ca-private-key((hash(cert-info)))
-
-
服务器发送
Server Hello Done。
如下图,服务器发送报文。

如下图,服务器选择了算法 TLS_RSA_WITH_AES_256_CBC_SHA。
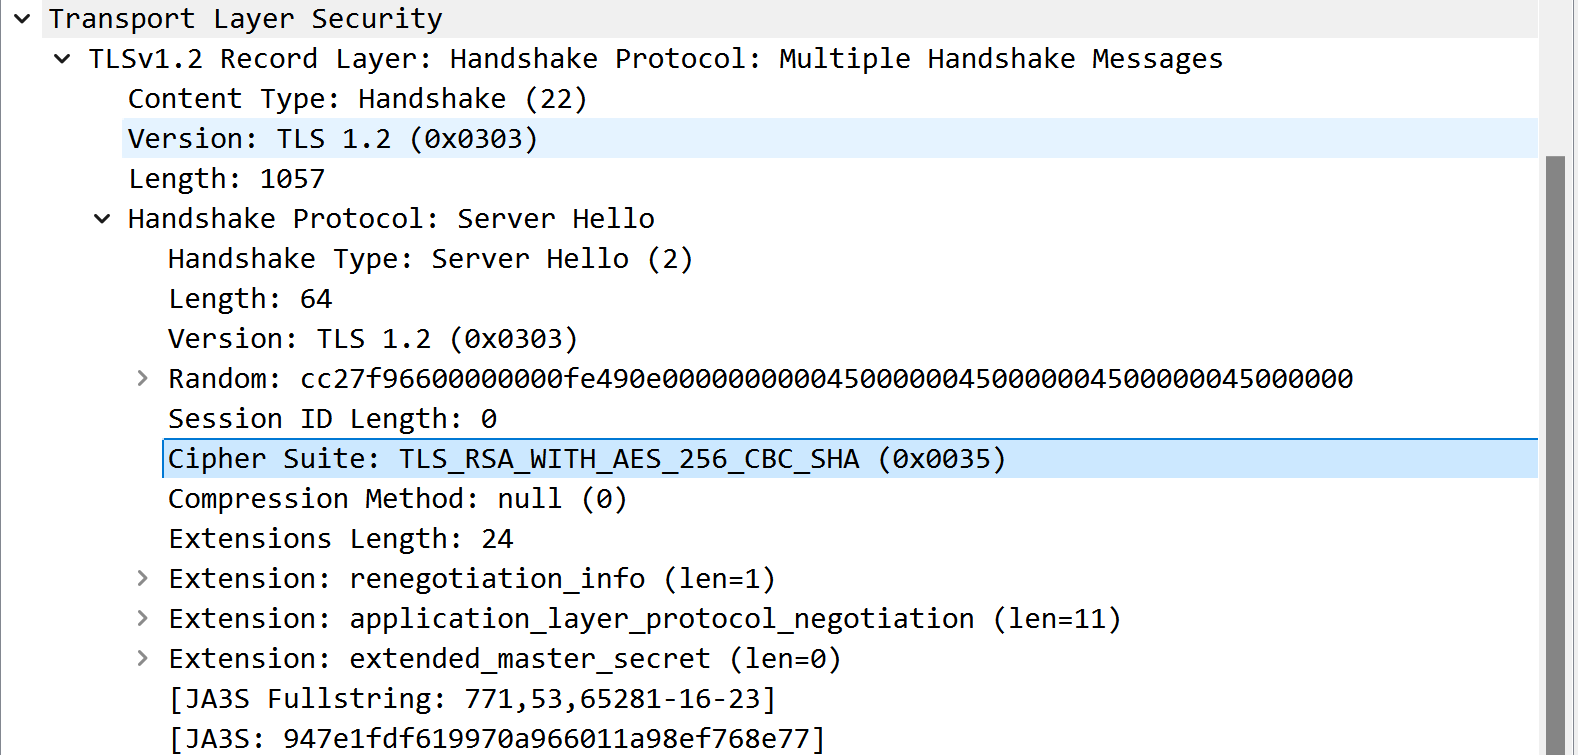
如下图,服务器发送了自己的证书,该证书被 CA 签名,签名使用的签名算法是 RSA,哈希算法是 SHA256。

步骤 3 - 身份认证,密钥交换,生成会话密钥
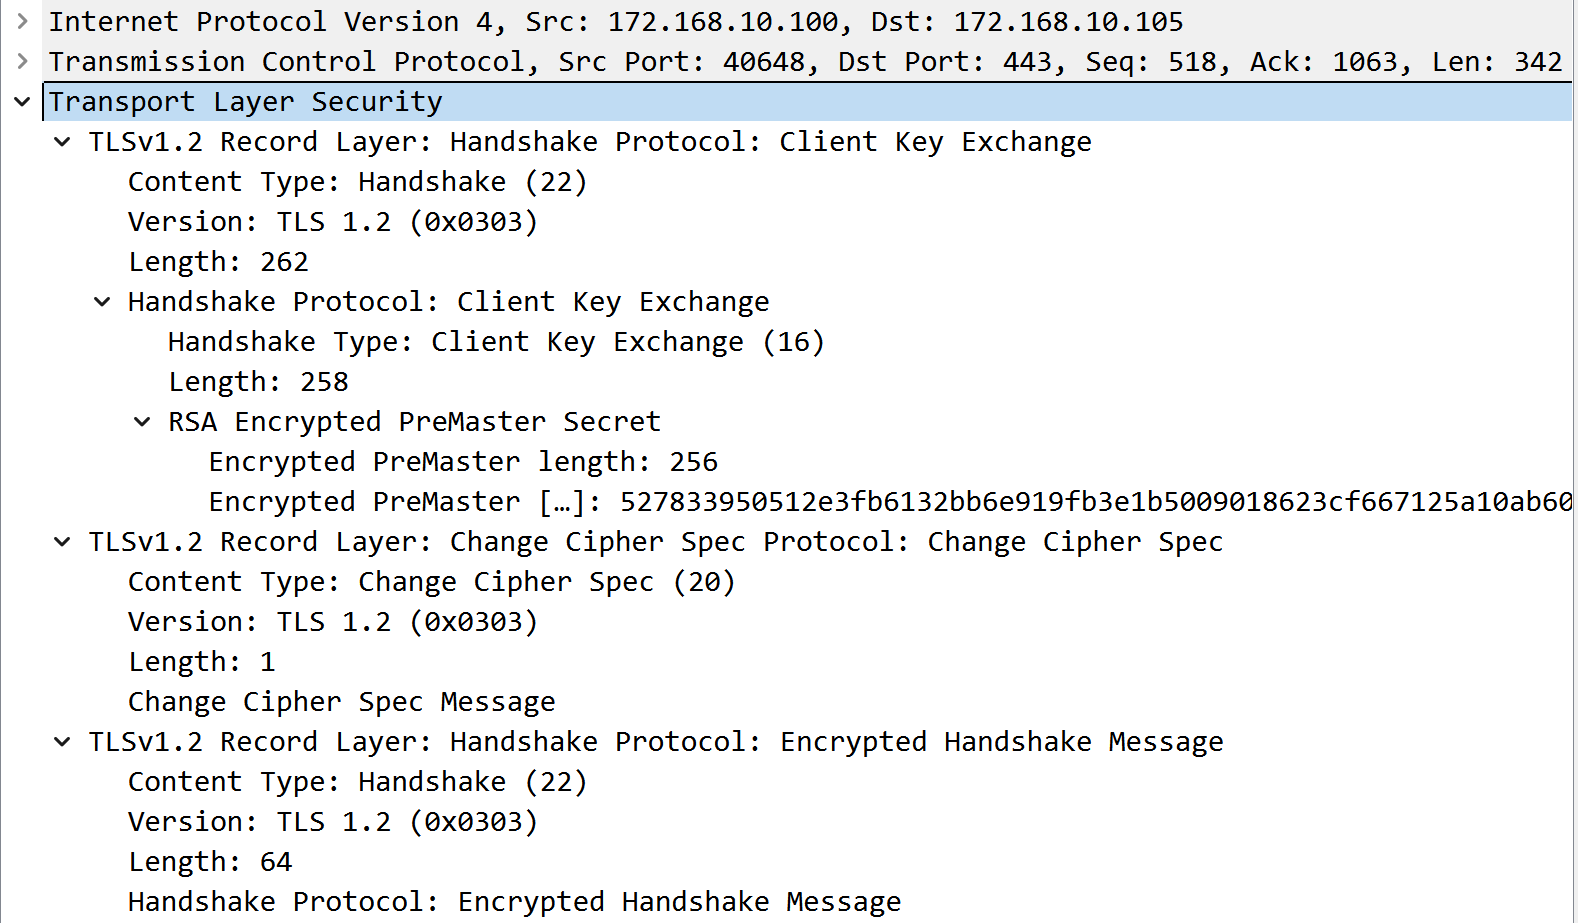
客户端发送 `Client Key Exchange, Change Cipher Spec, Encrypted Handshake Message`。
- 客户端从
Server Hello中获得随机数Server Random。 - 客户端使用 CA 的证书(一般已预置在浏览器中)验证服务器的证书。使用 CA 证书中包含的公钥解密服务器证书中的签名,得到哈希值,再计算服务器证书信息的哈希值,二者对比,若一致则验证通过。验证通过,证明了服务器证书是由浏览器内置的 CA 证书所代表的 CA 颁发的,即证明了内置 CA 信任服务器;而内置的 CA 是广受社会信任的 CA,已经是信任锚点。就这样,浏览器信任 CA,CA 信任服务器,所以浏览器信任服务器。这一信任链证明了服务器的身份值得信赖,且证书中的公钥的确属于服务器,此即身份认证。
- 客户端生成
PreMaster Secret,并使用服务器的公钥加密,使用Client Key Exchange发送给服务器,此即密钥交换。 - 客户端使用
Client Random, Server Random, PreMaster Secret生成会话密钥Session Key。 Change Cipher Spec向服务器表明:客户端已经拥有会话密钥,接下来发送的所有数据都会使用会话密钥加密。- 客户端计算出一个校验数据,使用会话密钥加密后,作为
Encrypted Handshake Message1 发送给服务器。
如下图,客户端发送报文。

如下图,在 Client Key Exchange 部分可以看到使用服务器的 RSA 公钥加密发送的 PreMaster Secret。
步骤 4 - 密钥交换,生成会话密钥
服务器发送 `Change Cipher Spec, Encrypted Handshake Message`。
- 服务器使用自己的私钥解密得到
PreMaster Secret,此即密钥交换。 - 服务器使用
Client Random, Server Random, PreMaster Secret生成会话密钥Session Key。 - 服务器使用
Session Key解密客户端发来的校验数据,并计算报文哈希值与校验数据进行对比。 Change Cipher Spec向客户端表明:服务器已经拥有会话密钥,接下来发送的所有数据都会使用会话密钥加密。- 服务器计算出一个校验数据,使用会话密钥加密后,作为
Encrypted Handshake Message2 发送给客户端。
如下图,服务器发送报文。

如下图,报文信息长这样。

步骤 5 - 完成握手,加密通信
双方发送 `Application Data`。
- 客户端使用
Session Key解密服务器发来的校验数据,并计算报文哈希值与校验数据进行对比。 - TLS 连接建立完成。接下来双方使用
Session Key加密数据,进行 HTTPS 通信。
如下图,发送加密的 HTTP 报文。


步骤 6 - 断开连接
客户端发送 `Encrypted Alert`。
客户端使用 Session Key 加密一个告警信息,发送 Encrypted Alert3 以断开 TLS 连接。后续再关闭 TCP 的连接。
基于 ECDHE 算法
在 RSA 握手中,PreMaster Secret 由客户端发送给服务器,从而完成密钥交换;而在 DH 算法中,客户端和服务器基于数学原理,根据一些公开的信息直接在各自的本地计算出 PreMaster Secret,连网络传输都给干掉了,所以 DH 算法更加安全。
DH 算法简介
原理
DH 算法是一种密钥交换算法,我们不管数学细节,极简阐述原理:
1
2
3
4
5
6
# 客户端和服务器各持有一对 DH 公私钥,使用它们各自的私钥和对端的公钥可以生成一个会话密钥,
# 而两端各自生成的会话密钥在数学上被证明是相等的。换言之,只要两端互相交换公钥就可以实现
# 无需网络传输的会话密钥交换。
client-session-key = dh(client-private-key, server-public-key)
server-session-key = dh(server-private-key, client-public-key)
session-key = client-session-key = server-session-key
分类
DH 算法基于离散对数问题而诞生,根据离散对数的计算方式(见数学难题)可以分为:
- 一般的 DH 算法
- ECDH 算法
根据 DH 的私钥是否固定,可以分为:
- Static DH
- Ephemeral DH(DHE)
在 Static DH 算法中,服务器每次连接所使用的 DH 私钥是不变的,应该是直接使用的与公钥证书成对的那个私钥,长期使用容易泄露,一旦泄露,黑客就能解密当前和以往每次连接的通信,这样的算法不具备前向安全性;而在 Ephemeral DH 算法中,服务器会为每次连接重新生成一个临时的 DH 私钥,这样就算私钥泄露,也只能解密这一次连接的通信,无法解密以往的通信,所以算法具备前向安全性。
ECDHE 握手流程

步骤 1 - 发起连接,协商参数
客户端发送 `Client Hello`。
同 RSA 握手。
步骤 2 - 协商参数,发送证书和 ECDH 信息
服务器发送 `Server Hello, Certificate, Server Key Exchange, Server Hello Done`。
相比 RSA 握手,多了一个 Server Key Exchange,阐述如下。
在这步,服务器会选择一种椭圆曲线,生成一对 ECDH 公私钥,并使用 Server Private Key 对 Client Random, Server Random, Curve Info, Server DH Public Key 的组合进行签名,最后将曲线信息、ECDH 公钥、签名都包含进 Server Key Exchange 中。
1
2
3
signature = server-private-key(
    hash(client-random, server-random, curve-info, server-dh-public-key)
)
此处签名和后续验签的意义在于证明 ECDH 信息的确是由证书中的公钥所代表的服务器发送的。
服务器是协商选择椭圆曲线的。客户端会通过
elliptic_curves或supported_groups扩展字段发送其支持的全部曲线,随后服务器再从中选择一个。随着标准的不断发展,elliptic_curves已经逐步被supported_groups取代。因 TLS 版本的不同,上述说法存在一些细节出入,但大体上没问题。
如下图,服务器发送报文。

如下图,服务器选择了算法 TLS_ECDHE_ECDSA_WITH_AES_128_GCM_SHA256。这里我们服务器的密钥对是 ECC 密钥对,所以协商选择了 ECDSA 签名算法。
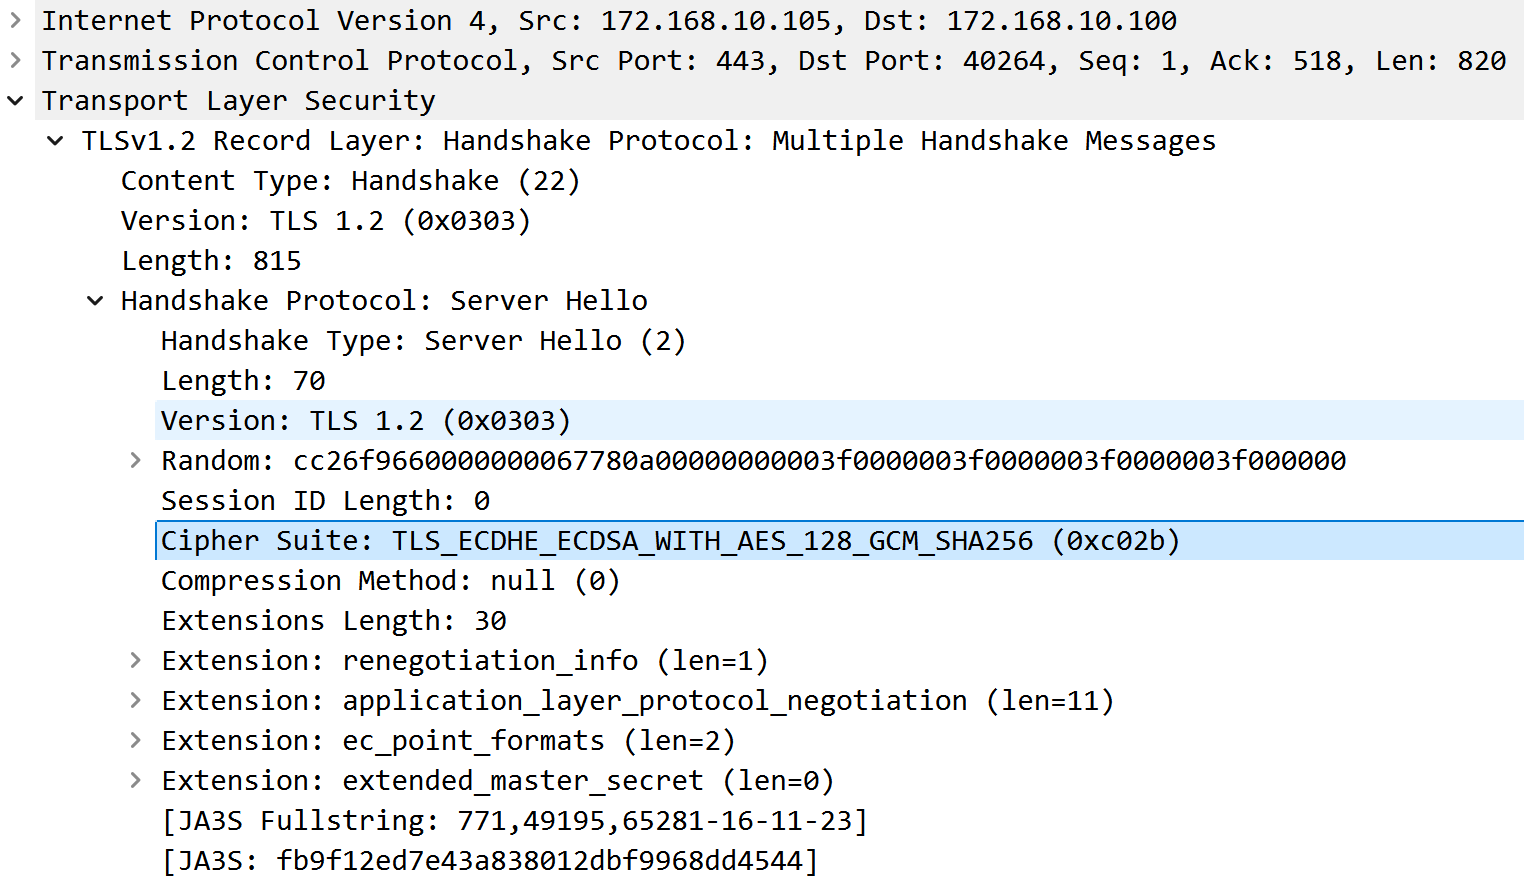
如下图,服务器发送了自己的证书,该证书被 CA 签名,签名算法是 ECDSA,哈希算法是 SHA256。这里我们 CA 的密钥对也是 ECC 密钥对,使用的 ECDSA 算法签发的公钥证书。
如下图,服务器发送了自己生成的 ECDH 公钥,其采用的 ECC 曲线为 Named Curve: secp256r1 (0x0017)。计算出的数字签名也被发送,由于服务器的私钥是 ECC 的,所以签名算法选择了 ECDSA。
步骤 3 - 身份认证,密钥交换,生成会话密钥
客户端发送 `Client Key Exchange, Change Cipher Spec, Encrypted Handshake Message`。
- 客户端从
Server Hello中获得随机数Server Random。 - 客户端使用 CA 的证书(一般已预置在浏览器中)验证服务器的证书,由此证明服务器的身份值得信赖,证书中的公钥的确代表服务器的身份,此即身份认证。
- 客户端使用证书中的公钥验证
Server Key Exchange中的签名,由此证明 ECDH 信息的发送者的确是公钥所代表的服务器,此即身份认证。 - 客户端基于服务器选择的曲线生成一对 ECDH 公私钥。
- 客户端将生成的
Client DH Public Key放入Client Key Exchange以发送给服务器。 - 客户端使用
Client DH Private Key, Server DH Public Key直接在本地计算出PreMaster Secret,后续服务器也会直接在本地计算出同样的PreMaster Secret,此即密钥交换。 - 客户端使用
Client Random, Server Random, PreMaster Secret生成会话密钥Session Key。 - 同 RSA 握手,发送
Change Cipher Spec和Encrypted Handshake Message1。
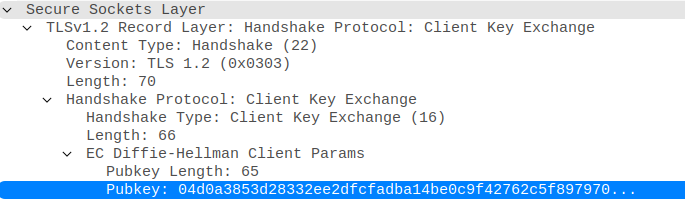
如下图,在 Client Key Exchange 部分可以看到发送的 Client DH Public Key。
步骤 4 - 密钥交换,生成会话密钥
服务器发送 `Change Cipher Spec, Encrypted Handshake Message`。
- 服务器使用
Client DH Public Key, Server DH Private Key直接在本地计算出与客户端一致的PreMaster Secret,此即密钥交换。 - 服务器使用
Client Random, Server Random, PreMaster Secret生成会话密钥Session Key。 - 服务器使用
Session Key解密客户端发来的校验数据,并计算报文哈希值与校验数据进行对比。 - 同 RSA 握手,发送
Change Cipher Spec和Encrypted Handshake Message2。
步骤 5 - 完成握手,加密通信
双方发送 `Application Data`。
同 RSA 握手。
步骤 6 - 断开连接
客户端发送 `Encrypted Alert`。
同 RSA 握手。
补充说明
校验数据 Finished Message
The Illustrated TLS Connection: Every Byte Explained 较为详细地展示了 ECDHE 握手的流程,其说法如下:
1
The verification data is built from a hash of all handshake messages and verifies the integrity of the handshake process.
RFC5246 The Transport Layer Security (TLS) Protocol Version 1.2 的说法如下:
1
2
3
4
5
6
7
8
9
10
11
12
13
# 7.4.9  Finished
The value handshake_messages includes all handshake messages starting
at ClientHello up to, but not including, this Finished message.  This
may be different from handshake_messages in Section 7.4.8 because it
would include the CertificateVerify message (if sent).  Also, the
handshake_messages for the Finished message sent by the client will
be different from that for the Finished message sent by the server,
because the one that is sent second will include the prior one.

Note: ChangeCipherSpec messages, alerts, and any other record types
are not handshake messages and are not included in the hash
computations.  Also, HelloRequest messages are omitted from handshake
hashes.
据此猜测,本文例子中,参与哈希的报文区间大概是 [Client Hello, Client/Server Finished), Exclude(Change Cipher Spec)。
MAC 摘要
所有使用 Session Key 加密的数据,其内都包含了一个名为 MAC (Message Authentication Code) 的报文摘要。MAC 有多种实现,比如 HMAC 和 GMAC。
HMAC 和 GMAC 的特点(AI):
- HMAC
- 基于哈希函数(如 SHA256)
- 适用于通用场景
- 需要显式地与加密算法(如 AES-CBC)结合使用
- GMAC
- 基于 Galois 域运算
- 专为 GCM 模式设计,通常与 AES-GCM 结合使用。
- 提供更高的性能,尤其是在硬件加速的场景中。
具体机制本文不研究,我的理解是数据和 MAC 一起被加密传输,对端解密后,再计算数据的 MAC 与接收到的 MAC 值对比,从而探知数据是否被篡改,此即完整性校验。
试计算 Server Key Exchange 中的签名并验签
在 ECDHE 握手-步骤 2 中,我们提到签名是对 Client Random, Server Random, Curve Info, Server DH Public Key 的组合进行的。信息收集如下:

1
2
# client random
\x5b\x70\x1c\x25\x8a\xf4\x56\x6a\x81\xa7\xee\xcf\xa0\x9f\xbb\xcb\x35\xfd\x64\xae\xe5\xb0\x46\x03\xda\x92\x4e\xa0\x07\x79\x35\x2a

1
2
# server random
\xcc\x26\xf9\x66\x00\x00\x00\x00\x67\x78\x0a\x00\x00\x00\x00\x00\x3f\x00\x00\x00\x3f\x00\x00\x00\x3f\x00\x00\x00\x3f\x00\x00\x00

1
2
3
4
5
6
# curve info
\x03\x00\x17

# server dh public key
\x41
\x04\x39\x3b\x76\x31\x87\x80\xe0\x0b\x27\xd4\xe7\xc4\x95\x27\x9c\x2f\xeb\x96\xa6\xe8\xd9\x87\x42\x2e\xce\xac\x84\xa2\x68\xda\x6f\x6f\x08\x05\xaa\xf9\x5d\x23\xa0\x24\xd1\x25\x30\x84\x11\x55\xcb\xe9\x69\xeb\xfb\xcf\xa8\xbd\xf8\x96\x8a\x0a\x7e\xad\x1c\xef\x84\xa8
将这些数据合并在一起:
1
2
# compose the data together
echo -n "\x5b\x70\x1c\x25\x8a\xf4\x56\x6a\x81\xa7\xee\xcf\xa0\x9f\xbb\xcb\x35\xfd\x64\xae\xe5\xb0\x46\x03\xda\x92\x4e\xa0\x07\x79\x35\x2a\xcc\x26\xf9\x66\x00\x00\x00\x00\x67\x78\x0a\x00\x00\x00\x00\x00\x3f\x00\x00\x00\x3f\x00\x00\x00\x3f\x00\x00\x00\x3f\x00\x00\x00\x03\x00\x17\x41\x04\x39\x3b\x76\x31\x87\x80\xe0\x0b\x27\xd4\xe7\xc4\x95\x27\x9c\x2f\xeb\x96\xa6\xe8\xd9\x87\x42\x2e\xce\xac\x84\xa2\x68\xda\x6f\x6f\x08\x05\xaa\xf9\x5d\x23\xa0\x24\xd1\x25\x30\x84\x11\x55\xcb\xe9\x69\xeb\xfb\xcf\xa8\xbd\xf8\x96\x8a\x0a\x7e\xad\x1c\xef\x84\xa8" > data
服务器本身的私钥也贴在此处,文件以 \n 结尾。这是一个基于曲线 prime256v1(secp256r1) 的 ECC 私钥。
1
2
3
4
5
6
7
8
9
10
# server private key
-----BEGIN EC PARAMETERS-----
BggqhkjOPQMBBw==
-----END EC PARAMETERS-----
-----BEGIN EC PRIVATE KEY-----
MHcCAQEEIIshQQR4px7Ek+5jRugTnySv5cjqSs1PbDlnmR1SSC4joAoGCCqGSM49
AwEHoUQDQgAE4Q+9ZBPkV4b2buqwPLB9EskoGByXTcPuF22znhtFG2R9gVlFyU4S
3GyXx3QaFOfLLNdyl/puch+GlZAZZsYKPw==
-----END EC PRIVATE KEY-----
其十六进制为:
1
2
3
# server private key hex
xxd -ps server-ecc-key.pem | tr -d "\n" | sed 's/\(..\)/\\x\1/g'
\x2d\x2d\x2d\x2d\x2d\x42\x45\x47\x49\x4e\x20\x45\x43\x20\x50\x41\x52\x41\x4d\x45\x54\x45\x52\x53\x2d\x2d\x2d\x2d\x2d\x0a\x42\x67\x67\x71\x68\x6b\x6a\x4f\x50\x51\x4d\x42\x42\x77\x3d\x3d\x0a\x2d\x2d\x2d\x2d\x2d\x45\x4e\x44\x20\x45\x43\x20\x50\x41\x52\x41\x4d\x45\x54\x45\x52\x53\x2d\x2d\x2d\x2d\x2d\x0a\x2d\x2d\x2d\x2d\x2d\x42\x45\x47\x49\x4e\x20\x45\x43\x20\x50\x52\x49\x56\x41\x54\x45\x20\x4b\x45\x59\x2d\x2d\x2d\x2d\x2d\x0a\x4d\x48\x63\x43\x41\x51\x45\x45\x49\x49\x73\x68\x51\x51\x52\x34\x70\x78\x37\x45\x6b\x2b\x35\x6a\x52\x75\x67\x54\x6e\x79\x53\x76\x35\x63\x6a\x71\x53\x73\x31\x50\x62\x44\x6c\x6e\x6d\x52\x31\x53\x53\x43\x34\x6a\x6f\x41\x6f\x47\x43\x43\x71\x47\x53\x4d\x34\x39\x0a\x41\x77\x45\x48\x6f\x55\x51\x44\x51\x67\x41\x45\x34\x51\x2b\x39\x5a\x42\x50\x6b\x56\x34\x62\x32\x62\x75\x71\x77\x50\x4c\x42\x39\x45\x73\x6b\x6f\x47\x42\x79\x58\x54\x63\x50\x75\x46\x32\x32\x7a\x6e\x68\x74\x46\x47\x32\x52\x39\x67\x56\x6c\x46\x79\x55\x34\x53\x0a\x33\x47\x79\x58\x78\x33\x51\x61\x46\x4f\x66\x4c\x4c\x4e\x64\x79\x6c\x2f\x70\x75\x63\x68\x2b\x47\x6c\x5a\x41\x5a\x5a\x73\x59\x4b\x50\x77\x3d\x3d\x0a\x2d\x2d\x2d\x2d\x2d\x45\x4e\x44\x20\x45\x43\x20\x50\x52\x49\x56\x41\x54\x45\x20\x4b\x45\x59\x2d\x2d\x2d\x2d\x2d\x0a
现在使用私钥对数据签名,openssl 会根据私钥类型自动选择相应的签名算法,对于 ECC 私钥,会默认选择 ECDSA 算法。报文中实际使用的签名算法为 ecdsa_secp256r1_sha256,这里我们使用 -sha256,使哈希算法也保持一致。
1
2
3
4
5
6
7
8
9
10
# sign the data with the server private key
openssl dgst -sign server-ecc-key.pem -sha256 -out sig data

# see the signature
xxd -ps sig

# result:
3044022020b6c7803f90785be49b6d70744f82bc7a421718da24e39abb74
3505fe23882b02203b56f27ca41156b86948f658e07eda922f06dc6c4284
bbd179c6da108a48b4e5
至此我们得到了签名,但是该签名与报文中的实际值并不相同。不仅如此,你会发现每次签名得到的结果都是不同的。这是因为 ECDSA 签名算法内部混入了随机值,即便使用同一私钥对同一消息进行多次签名,结果也会不同。

如果是 RSA 私钥,那么计算得到的 RSA 签名是可以与报文中的实际值对上的。使用同一私钥对同一消息进行多次签名,结果是相同的。
不过这并不会影响验签的结果。下面我们进行验签。
实际验签时,客户端会从服务器证书中提取出公钥。如下,文件以 \n 结尾。
1
2
3
4
5
6
7
8
9
10
11
12
# extract the public key from the server certificate
openssl x509 -in server-ecc-cert.pem -pubkey -noout > server-ecc-pub.pem

# server public key
-----BEGIN PUBLIC KEY-----
MFkwEwYHKoZIzj0CAQYIKoZIzj0DAQcDQgAE4Q+9ZBPkV4b2buqwPLB9EskoGByX
TcPuF22znhtFG2R9gVlFyU4S3GyXx3QaFOfLLNdyl/puch+GlZAZZsYKPw==
-----END PUBLIC KEY-----

# server public key hex
xxd -ps server-ecc-pub.pem | tr -d "\n" | sed 's/\(..\)/\\x\1/g'
\x2d\x2d\x2d\x2d\x2d\x42\x45\x47\x49\x4e\x20\x50\x55\x42\x4c\x49\x43\x20\x4b\x45\x59\x2d\x2d\x2d\x2d\x2d\x0a\x4d\x46\x6b\x77\x45\x77\x59\x48\x4b\x6f\x5a\x49\x7a\x6a\x30\x43\x41\x51\x59\x49\x4b\x6f\x5a\x49\x7a\x6a\x30\x44\x41\x51\x63\x44\x51\x67\x41\x45\x34\x51\x2b\x39\x5a\x42\x50\x6b\x56\x34\x62\x32\x62\x75\x71\x77\x50\x4c\x42\x39\x45\x73\x6b\x6f\x47\x42\x79\x58\x0a\x54\x63\x50\x75\x46\x32\x32\x7a\x6e\x68\x74\x46\x47\x32\x52\x39\x67\x56\x6c\x46\x79\x55\x34\x53\x33\x47\x79\x58\x78\x33\x51\x61\x46\x4f\x66\x4c\x4c\x4e\x64\x79\x6c\x2f\x70\x75\x63\x68\x2b\x47\x6c\x5a\x41\x5a\x5a\x73\x59\x4b\x50\x77\x3d\x3d\x0a\x2d\x2d\x2d\x2d\x2d\x45\x4e\x44\x20\x50\x55\x42\x4c\x49\x43\x20\x4b\x45\x59\x2d\x2d\x2d\x2d\x2d\x0a
使用公钥验签。
1
2
3
# verify the signature
openssl dgst -verify server-ecc-pub.pem -signature sig -sha256 data
Verified OK
验证通过。
为什么验签要使用证书而不能直接使用公钥?
现有两个人 A 和 B,B 用自己的私钥签名了一段信息,发给 A。现在 A 用 B 的公钥验签,发现能够成功解密,所以以此认定信息的发送者是 B。这似乎没有问题,为什么还需要公钥证书呢?
问题的关键在于,B 的公钥是否可信,B 的公钥是否真的是 B 的公钥。如果有中间人攻击,攻击者 C 掉包了 B 的公钥为自己的公钥,然后自己签名发送一段信息给 A,那么 A 就会误以为信息的发送者是 B,而实际发送者却是 C。
所以,有必要确保公钥的确是 B 的,而证书能够证明这一点。证书由广受社会信任的 CA 签发,其中包含了公钥本身和公钥所代表的身份信息。A 在收到 B 的证书后,使用 CA 的证书验证 B 的证书,验证通过即代表 B 的证书的确是由 CA 签发的,CA 信任 B 的身份,而 CA 是广受信任的,A 自然也信任 CA,于是 A 可以信任 B 的身份,也即:只要验过了证书,就可以相信公钥所代表的身份,就证明公钥的确属于它所代表的那个身份机构。
即便攻击者掉包 B 的公钥,他也无法伪造 CA 的签名,所以攻击者是无法伪造证书的。证书/信任链机制以 CA 这样的第三方权威机构作背书,能够防范中间人攻击,确保公钥的真实性。
以下情况都没有使用证书:
- ssh连接新服务器时,服务器会发来自己的公钥,用户可以选择是否信任该公钥,通常都会选择yes。ssh会记录下该服务器ip/域名和其对应的公钥,并且以后都予以信任。若服务器的公钥突然发生改变,ssh将发出警告,提示用户警惕连接对象的真实性。
- 日常我们自己使用ssh时,都是亲自将自己客户端的公钥放到服务器上,服务器也是直接信任这些公钥的。
- 使用github作为git远程库,git也会通过ssh以公私钥的形式连接github。用户通常需要先登录自己的账号,也就是先过一遍身份认证,然后亲自把自己的公钥放到github上,以后github就会直接信任该公钥代表的身份。
如果 A 能够直接信任 B,直接认可公钥的真实性,这就不需要证书了。A 以后直接使用公钥验签即可。然而,在开放的网络通信中,证书/信任链机制不可或缺。
TLS 算法名称的含义
在熟悉了握手的知识以后,我们再来理解算法名称的含义。这并没有想象中那么简单,由于算法版本的更迭,算法名称的含义会有一些差别。先贴上几个算法名称的例子:
1
2
3
4
5
6
7
8
9
TLS_RSA_WITH_AES_256_CBC_SHA256
TLS_RSA_WITH_AES_128_GCM_SHA256
TLS_RSA_WITH_AES_256_GCM_SHA384
TLS_ECDHE_ECDSA_WITH_AES_128_CBC_SHA
TLS_ECDHE_ECDSA_WITH_AES_128_GCM_SHA256
TLS_ECDHE_ECDSA_WITH_AES_256_GCM_SHA384
TLS_ECDHE_RSA_WITH_AES_256_GCM_SHA384
TLS_ECDH_RSA_WITH_AES_256_CBC_SHA
TLS_ECDH_ECDSA_WITH_AES_256_CBC_SHA
SHA 是指 HMAC 计算以及 Finished 校验等流程所使用的哈希算法,CBC/GCM 是分组密码工作模式,AES_256 是共享密码算法和共享密钥长度。紧跟在 TLS 后面的 RSA/ECDHE/ECDH 是密钥交换算法,其中 DHE 密钥交换过程中会用到签名,所以后面还跟了一个签名算法——ECDSA/RSA。
问题出现了,ECDH 密钥交换中,ECDH 密钥对不是临时生成的,服务器是直接将证书作为 ECDH 公钥发给客户端的,这个过程中服务器不需要进行额外的签名,那为什么会存在 ECDH_RSA/ECDH_ECDSA 这样的算法名称呢?这涉及一个被广泛误解的问题:算法名称中的签名算法到底是指证书上所使用的签名还是握手过程中所使用的签名?搞清这个问题大概没什么实用价值,但不搞清实在让我不舒服😣。在一众 RFC 中,我逐渐找到了答案。
RFC4346 The Transport Layer Security (TLS) Protocol Version 1.1
1
2
3
4
5
6
7
8
9
10
11
12
13
14
15
16
17
18
19
# 7.4.2  Server Certificate
The certificate type MUST be appropriate for the selected cipher
suite's key exchange algorithm, and is generally an X.509v3
certificate.  It MUST contain a key that matches the key exchange
method, as follows.  Unless otherwise specified, the signing
algorithm for the certificate MUST be the same as the algorithm
for the certificate key.  Unless otherwise specified, the public
key MAY be of any length.

Key Exchange Algorithm  Certificate Key Type
RSA                     RSA public key; the certificate MUST
                        allow the key to be used for encryption.
DHE_DSS                 DSS public key.
DHE_RSA                 RSA public key that can be used for
                        signing.
DH_DSS                  Diffie-Hellman key. The algorithm used
                        to sign the certificate MUST be DSS.
DH_RSA                  Diffie-Hellman key. The algorithm used
                        to sign the certificate MUST be RSA.
这是 TLS1.1 的 RFC。上面的意思是:证书的签名算法必须与确定密钥对类型的算法保持一致。文中还举了几个例子:
| 密钥交换算法 | 密钥对类型 | 握手签名算法(推理) | 证书签名算法(推理) |
|---|---|---|---|
| RSA | RSA | / | RSA |
| DHE_DSS | DSS | DSS | DSS |
| DHE_RSA | RSA | RSA | RSA |
| DH_DSS | DH | / | DSS |
| DH_RSA | DH | / | RSA |
注(AI):DSS 是一个数字签名标准,DSA 算法是其最初的核心实现,随着 DSS 标准的版本更新,RSA 和 ECDSA 也被纳入标准中。
我们可以发现上表中的两个 DH 密钥交换算法没有遵守“证书的签名算法必须与确定密钥对类型的算法保持一致”的规定,这是因为 DH 算法只能用作密钥交换,不能用来签名,这才额外追加了一个算法名称,用于指定证书的签名算法。
RFC4346 The Transport Layer Security (TLS) Protocol Version 1.1
1
2
3
4
5
6
7
8
9
# F.1.1.3  Diffie-Hellman Key Exchange with Authentication
When Diffie-Hellman key exchange is used, the server can either
supply a certificate containing fixed Diffie-Hellman parameters or
use the server key exchange message to send a set of temporary
Diffie-Hellman parameters signed with a DSS or RSA certificate.
Temporary parameters are hashed with the hello.random values before
signing to ensure that attackers do not replay old parameters.  In
either case, the client can verify the certificate or signature to
ensure that the parameters belong to the server.
这段说明服务器可以通过两种方式提供 DH 参数:一种是直接发送 DH 证书,客户端通过验证证书证明 DH 参数的确属于服务器;一种是发送带签名的临时生成的 DHE 参数,客户端通过验签证明 DHE 参数的确属于服务器。
这段至少可以佐证我对 DH 和 DHE 的理解是正确的。
RFC4492 Elliptic Curve Cryptography (ECC) Cipher Suites for Transport Layer Security (TLS)
1
2
3
4
5
6
7
8
9
10
11
12
13
14
15
16
17
18
# 2.1  ECDH_ECDSA
In ECDH_ECDSA, the server’s certificate MUST contain an ECDH-capable
public key and be signed with ECDSA.

# 2.2  ECDHE_ECDSA
In ECDHE_ECDSA, the server’s certificate MUST contain an ECDSA
capable public key and be signed with ECDSA.

# 2.3  ECDH_RSA
This key exchange algorithm is the same as ECDH_ECDSA except that the
server’s certificate MUST be signed with RSA rather than ECDSA.

# 2.4  ECDHE_RSA
This key exchange algorithm is the same as ECDHE_ECDSA except that
the server’s certificate MUST contain an RSA public key authorized
for signing, and that the signature in the ServerKeyExchange message
must be computed with the corresponding RSA private key.  The server
certificate MUST be signed with RSA.
这是 TLS1.1 ECC 算法的 RFC。所述逻辑也是类似的,与上面的说法都对得上。
问题总结 - TLS1.1:
- 证书的签名算法必须与确定密钥对类型的算法保持一致。
- RSA 密钥交换中没有签名的过程,故算法名称中没有签名算法。证书的签名算法须为
RSA。 - DHE 密钥交换中有签名的过程,故算法名称中指定了签名算法,如
ECDHE_RSA。证书的签名算法须与该签名算法一致。 - DH 密钥交换中没有签名的过程,其算法名称中本不需要指定签名算法,然证书的签名算法须与确定密钥对类型的算法(DH)保持一致,而 DH 算法无法用于签名,故算法名称中额外指定了证书的签名算法,如
ECDH_RSA。
RFC5246 The Transport Layer Security (TLS) Protocol Version 1.2
1
2
3
4
5
6
7
8
9
10
11
12
13
14
15
16
17
18
19
20
21
22
23
24
25
26
27
28
29
30
31
32
33
34
35
36
37
38
39
40
41
42
43
# A.7  Changes to RFC 4492
As described in Sections 7.4.2 and 7.4.6, the restrictions on the
signature algorithms used to sign certificates are no longer tied to
the cipher suite (when used by the server) or the
ClientCertificateType (when used by the client).  Thus, the
restrictions on the algorithm used to sign certificates specified in
Sections 2 and 3 of RFC 4492 are also relaxed.

# 7.4.2  Server Certificate
If the client provided a "signature_algorithms" extension, then all
certificates provided by the server MUST be signed by a
hash/signature algorithm pair that appears in that extension.  Note
that this implies that a certificate containing a key for one
signature algorithm MAY be signed using a different signature
algorithm (for instance, an RSA key signed with a DSA key).  This is
a departure from TLS 1.1, which required that the algorithms be the
same.  Note that this also implies that the DH_DSS, DH_RSA,
ECDH_ECDSA, and ECDH_RSA key exchange algorithms do not restrict the
algorithm used to sign the certificate.  Fixed DH certificates MAY be
signed with any hash/signature algorithm pair appearing in the
extension.  The names DH_DSS, DH_RSA, ECDH_ECDSA, and ECDH_RSA are
historical.

# 7.4.1.4.1  Signature Algorithms
The client uses the "signature_algorithms" extension to indicate to
the server which signature/hash algorithm pairs may be used in
digital signatures.

# 7.4.1.4.1  Signature Algorithms
The semantics of this extension are somewhat complicated because the
cipher suite indicates permissible signature algorithms but not hash
algorithms.  Sections 7.4.2 and 7.4.3 describe the appropriate rules.

# 7.4.3  Server Key Exchange Message
If the client has offered the "signature_algorithms" extension, the
signature algorithm and hash algorithm MUST be a pair listed in that
extension.  Note that there is a possibility for inconsistencies
here.  For instance, the client might offer DHE_DSS key exchange but
omit any DSA pairs from its "signature_algorithms" extension.  In
order to negotiate correctly, the server MUST check any candidate
cipher suites against the "signature_algorithms" extension before
selecting them.  This is somewhat inelegant but is a compromise
designed to minimize changes to the original cipher suite design.
这是 TLS1.2 的 RFC。新增了 signature_algorithms 扩展字段,它代表了客户端支持的签名算法。密钥交换过程中可能用到的签名算法由此字段协商而来。证书的签名算法不再受 TLS 算法名称约束,只须位列 signature_algorithms 所支持的算法列表中。
对于密钥交换过程中可能出现的签名过程,TLS 算法名称中只指定了签名算法,却没有哈希算法(名称中的哈希算法为 HMAC 或 Finished 报文所用),遂有 signature_algorithms,其中的名称同时包含了签名和哈希算法。如此,TLS 算法名称和扩展字段都给出了签名算法名称,为同时满足二者约束,服务器必须予以检查,最终协商选择出的签名算法须同时兼容 TLS 算法名称和扩展字段。
举例,若 TLS 算法名称为 ECDHE_ECDSA,扩展 signature_algorithms 中含有 ecdsa_secp256r1_sha256, rsa_pkcs1_sha256,那么服务器应协商选择出 ecdsa_secp256r1_sha256 作为签名算法。既如此,证书应选用 ECC 证书,但证书自己的签名可以是 RSA。
另,对于静态 DH 密钥交换算法如 ECDH_ECDSA, ECDH_RSA,其名称中的签名算法已经不含有任何实际约束意义,此类迷惑性十足的名称之存在皆系历史原因。
1
2
3
4
5
6
7
8
9
# 2.1  ECDHE_ECDSA
In ECDHE_ECDSA, the server’s certificate MUST contain an ECDSA- or
EdDSA-capable public key.

# 2.2  ECDHE_RSA
This key exchange algorithm is the same as ECDHE_ECDSA except that
the server’s certificate MUST contain an RSA public key authorized
for signing and the signature in the ServerKeyExchange message must
be computed with the corresponding RSA private key.
这是 TLS1.2 出现后,有关 ECC 算法的 RFC。相比 RFC4492 的表述,该表述没有再特别提及证书本身的签名应为何算法,因为证书的签名算法已不再受 TLS 算法名称约束,只要位列 signature_algorithms 的算法列表,是什么算法都有可能。
问题总结 - TLS1.2:
- 密钥交换过程中可能用到的签名算法根据客户端支持的 TLS 算法和
signature_algorithms扩展协商而来。 - 证书的签名算法不再受 TLS 算法名称约束,只须位列
signature_algorithms所支持的算法列表中。 - 静态 DH 密钥交换算法如
ECDH_ECDSA, ECDH_RSA,其名称中的签名算法不具有任何实际约束意义,此类名称之存在皆系历史原因。
问题结论:
TLS 算法名称中的签名算法基本指的是握手过程中所使用的签名,而非特指证书本身的签名,不过二者也并非毫无关联,具体细节参见上面的分析和总结。
构建证书链
尝试使用 openssl 构建如下证书链。
1
Root CA Cert -> Intermediate CA Cert -> End Entity Cert
根 CA 作为信任锚点,它的证书是自签名证书;根 CA 给中级 CA 颁发中级证书;中级 CA 给用户颁发末端证书。
1
2
3
4
5
6
7
8
9
10
11
12
13
14
15
16
17
18
19
20
21
22
23
24
25
26
27
28
29
30
31
32
33
34
35
36
37
38
39
40
41
42
43
44
45
46
47
48
49
50
51
52
53
54
55
56
57
58
59
60
61
62
63
64
65
66
67
68
69
70
71
72
73
74
75
76
77
78
79
80
81
82
83
# build the root cert
# generate private key for the root ca
openssl genrsa -out root-ca-key.pem 2048

# generate cert sign request of the root ca
# here the key content of the `openssl-ca.cnf` will show at the end
openssl req -new -key root-ca-key.pem -out root-ca-csr.pem -config openssl-ca.cnf

# fill the prompted fields like follows
Country Name (2 letter code) [AU]:CN
State or Province Name (full name) [Some-State]:Zhejiang
Locality Name (eg, city) []:Hangzhou
Organization Name (eg, company) [Internet Widgits Pty Ltd]:lcatmiao
Organizational Unit Name (eg, section) []:lcatmiao-ca
Common Name (e.g. server FQDN or YOUR name) []:lcatmiao-ca.com
Email Address []:lcatmiao@test.com

# self-sign the public key retrived implicitly from the cert sign request
# of the root ca with the private key of also the root ca then get the
# root cert
openssl x509 -req -days 3650 -sha256 -extfile openssl-ca.cnf -extensions v3_ca -in root-ca-csr.pem -signkey root-ca-key.pem -out root-ca-cert.pem

# build the intermediate cert
# generate private key for the intermediate ca
openssl genrsa -out intermediate-ca-key.pem 2048

# generate cert sign request of the intermediate ca
openssl req -new -key intermediate-ca-key.pem -out intermediate-ca-csr.pem -config openssl-ca.cnf

# fill the prompted fields like follows
Country Name (2 letter code) [AU]:CN
State or Province Name (full name) [Some-State]:Zhejiang
Locality Name (eg, city) []:Hangzhou
Organization Name (eg, company) [Internet Widgits Pty Ltd]:lcatmiao
Organizational Unit Name (eg, section) []:lcatmiao-ca
Common Name (e.g. server FQDN or YOUR name) []:lcatmiao-ca.com
Email Address []:lcatmiao@test.com

# sign the public key retrived implicitly from the cert sign request
# of the intermediate ca with the private key of the root ca then
# get the intermediate cert
openssl x509 -req -days 3650 -sha256 -extfile openssl-ca.cnf -extensions v3_ca -in intermediate-ca-csr.pem -CA root-ca-cert.pem -CAkey root-ca-key.pem -CAcreateserial -out intermediate-ca-cert.pem

# build the end entity cert
# generate private key for the end entity
openssl genrsa -out end-entity-key.pem 2048

# generate cert sign request of the end entity
# here the key content of the `openssl-user.cnf` will show at the end
openssl req -new -key end-entity-key.pem -out end-entity-csr.pem -config openssl-user.cnf

# fill the prompted fields like follows
Country Name (2 letter code) [AU]:CN
State or Province Name (full name) [Some-State]:Zhejiang
Locality Name (eg, city) []:Hangzhou
Organization Name (eg, company) [Internet Widgits Pty Ltd]:lcatmiao
Organizational Unit Name (eg, section) []:lcatmiao-user
Common Name (e.g. server FQDN or YOUR name) []:172.168.10.110
Email Address []:lcatmiao@test.com

# sign the public key retrived implicitly from the cert sign request
# of the end entity with the private key of the intermediate ca then
# get the end entity cert
openssl x509 -req -days 3650 -sha256 -extfile openssl-user.cnf -extensions usr_cert -in end-entity-csr.pem -CA intermediate-ca-cert.pem -CAkey intermediate-ca-key.pem -CAcreateserial -out end-entity-cert.pem

# After doing all the operations above, `ls` shows that
# all the files we have are as follows.
end-entity-cert.pem
end-entity-csr.pem
end-entity-key.pem
intermediate-ca-cert.pem
intermediate-ca-cert.srl
intermediate-ca-csr.pem
intermediate-ca-key.pem
openssl-ca.cnf
openssl-user.cnf
root-ca-cert.pem
root-ca-cert.srl
root-ca-csr.pem
root-ca-key.pem

# we can see the cert info by using this cmd
openssl x509 -in end-entity-cert.pem -noout -text
1
2
3
4
5
6
7
8
9
10
11
12
13
14
15
16
# key content of the openssl-ca.cnf
# the following is just a test example that only lists the modified cfg items

[ req ]
req_extensions = v3_req # The extensions to add to a certificate request

[ v3_req ]
basicConstraints = CA:TRUE
# keyUsage = nonRepudiation, digitalSignature, keyEncipherment
subjectAltName = @alt_names

[ v3_ca ]
subjectAltName = @alt_names

[ alt_names ]
DNS.1 = lcatmiao-ca.com
1
2
3
4
5
6
7
8
9
10
11
12
13
14
15
16
17
18
19
20
# key content of the openssl-user.cnf
# the following is just a test example that only lists the modified cfg items

[ req ]
req_extensions = v3_req # The extensions to add to a certificate request

[ usr_cert ]
subjectAltName = @alt_names

[ v3_req ]
basicConstraints = CA:FALSE
# keyUsage = nonRepudiation, digitalSignature, keyEncipherment
subjectAltName = @alt_names

[ alt_names ]
IP.1 = 172.168.10.110
IP.2 = 172.168.10.105
IP.3 = 172.168.10.106
IP.4 = 172.168.10.107
IP.5 = 172.168.10.108
至此,一个简单的证书链就构建好了。下面我们来验证一下这个证书链。
1
2
3
4
5
6
7
8
9
10
11
12
13
14
15
16
17
18
19
# verify the root cert which is a self-sign cert
openssl verify -CAfile root-ca-cert.pem root-ca-cert.pem
# output:
root-ca-cert.pem: OK

# verify the intermediate cert
openssl verify -trusted root-ca-cert.pem intermediate-ca-cert.pem
# output:
intermediate-ca-cert.pem: OK

# verify the end entity cert
openssl verify -partial_chain -trusted intermediate-ca-cert.pem end-entity-cert.pem
# output:
end-entity-cert.pem: OK

# directly verify the whole cert chain which has only three levels
openssl verify -CAfile root-ca-cert.pem -untrusted intermediate-ca-cert.pem end-entity-cert.pem
# output:
end-entity-cert.pem: OK
本地使用命令行都能验过,不代表网络通信时也能验过。实际通信的行为受各种配置的影响 ,比如实测发现末端证书中配置的 IP 地址或者域名要与服务器保持一致,否则不通。
顺带一提,实际报文中,证书链的顺序:末端证书在前,中级证书按层级顺序依次跟随,根证书一般不包含在链中。
RFC5246 The Transport Layer Security (TLS) Protocol Version 1.2
1
2
3
4
5
6
7
8
9
10
# 7.4.2  Server Certificate
certificate_list
   This is a sequence (chain) of certificates.  The sender's
   certificate MUST come first in the list.  Each following
   certificate MUST directly certify the one preceding it.  Because
   certificate validation requires that root keys be distributed
   independently, the self-signed certificate that specifies the root
   certificate authority MAY be omitted from the chain, under the
   assumption that the remote end must already possess it in order to
   validate it in any case.
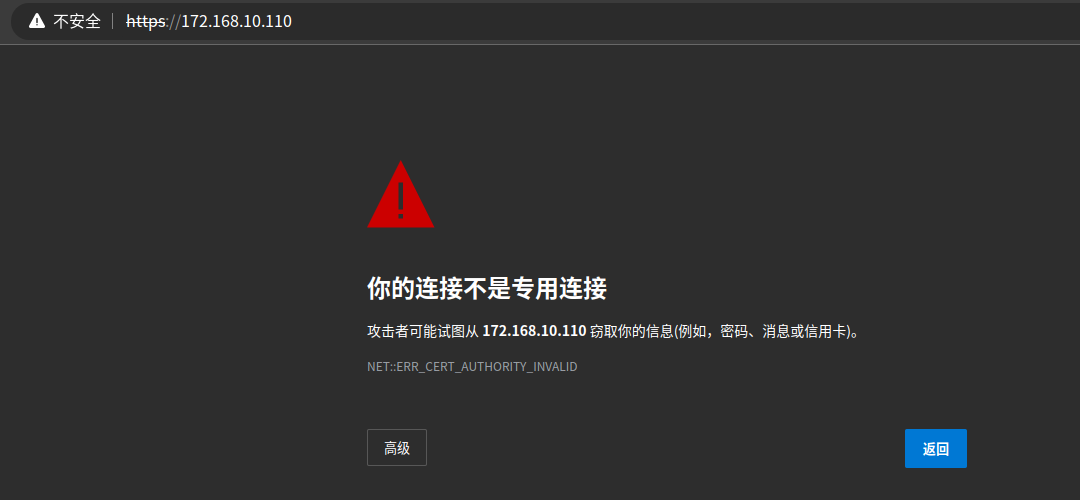
消除浏览器安全警告
当客户端(浏览器)没能验过服务器发来的证书时,就会显示如下的安全警告页面,并且 URI 栏会有“不安全”的提示。如果服务器的证书是我们自己签发的,自然无法被浏览器内置的 CA 证书验过,我们需要将自己生成的根证书导入浏览器才行。
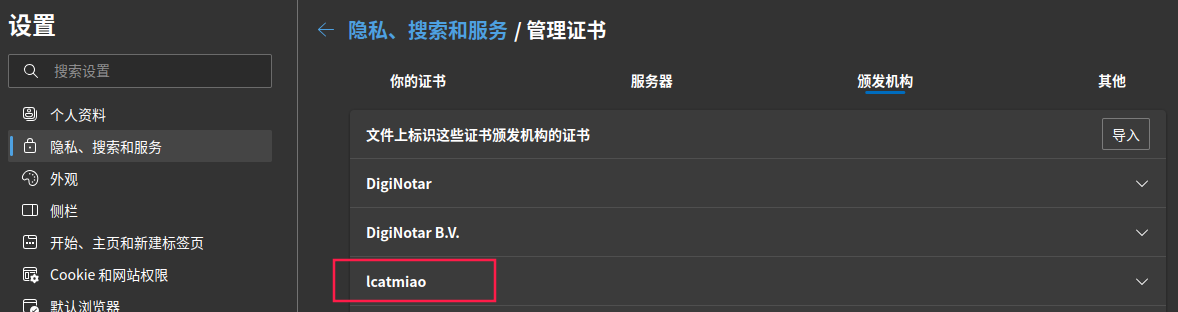
将自己生成的根证书导入浏览器,作为受信任的颁发机构。
此后再访问服务器,就是正常的 https 访问了。
如果服务器发来的证书不止一个,而是多级证书,即证书链的一部分,那么理论上导入浏览器的证书应该是证书链的另一部分,二者合一要能构成完整的证书链才行。
参考资料
- 《图解HTTP》
- Keyless SSL: The Nitty Gritty Technical Details
- The Illustrated TLS Connection: Every Byte Explained
- RFC4346 The Transport Layer Security (TLS) Protocol Version 1.1
- RFC4492 Elliptic Curve Cryptography (ECC) Cipher Suites for Transport Layer Security (TLS)
- RFC5246 The Transport Layer Security (TLS) Protocol Version 1.2
- RFC8422 Elliptic Curve Cryptography (ECC) Cipher Suites for Transport Layer Security (TLS) Versions 1.2 and Earlier
- RFC7919 Negotiated Finite Field Diffie-Hellman Ephemeral Parameters for Transport Layer Security (TLS)